[RenPy] 纯文本查看 复制代码
### 地图移动系统/16:9地砖方格版 ####################################################
# 使用说明/必看
# 本系统由 Maz 用 屎山 编写
# 主要面向 renpy 新手用户进行定制化,基本由 renpy 简单代码编写完成
# 将系统模块化,即插即用,并内置使用说明
# 如果您嫌说明过长,仅需关注【】内的使用说明
# 注1 为了避免变量名冲突,此系统内变量名均为注释中()内汉字的拼音首字母+英文
# 注2 为了避免名称冲突,系统包内文件、变量均特殊命名化,请在使用前进行查重
# 注3 注释中【】内的注释为简单自定义化的说明
# 注4 如果您使用的是ATOM文本编辑器,快捷键 ctrl+shift+alt+{ 收起全部子级更方便您对本系统的查阅
# 注5 如果您使用的是VScode文本编辑器,快捷键 ctrl+K,CTRL+0 收起全部子级更方便您对本系统的查阅
# 此地图系统的思路是将画面划分为16:9的方格,即最左上方为坐标(1,1)最右下方坐标为(16,9)
# 这里称为我定义的 “虚拟坐标”
# 系统实际计算使用的是真实的坐标,如(60,60),对应的是虚拟坐标的(1,1)
# 定义虚拟坐标的目的是为了具体的控制移动长短和适当的增加交互次数,也为了方便更有秩序的对地图进行规划
# 实际上在您理解这个简单系统的构造之后,您完全可以写成32:18的方格地图或是完全屏弃“方格”这个概念
# 这个概念和构思实际上来源于RPGmaker的地砖移动
# 【此系统的核心思路其实是通过虚拟按键对角色进行移动限制】
# 【为了让图像处于地图方格的正中心,需要理解真实坐标与虚拟坐标的转化】
# 【真实坐标=虚拟坐标*地砖方格边长-地砖方格边长的一半】
# 【以本系统的16:9为例,即为 真实坐标=虚拟坐标*120-60】
###################################################################################
### 系统正文 #######################################################################
## 图像模块 ########################################################################
#通用变换:旋转(只是为了节省素材)
transform tybh_fxy:
anchor (0.5,0.5)
transform tybh_fxx:
anchor (0.5,0.5)
rotate 90
transform tybh_fxz:
anchor (0.5,0.5)
rotate 180
transform tybh_fxs:
anchor (0.5,0.5)
rotate 270
#(左右手模式切换)
# 这是模拟手柄界面的左右切换,如不需要可删除这个小功能
# 这个功能意在避免虚拟按键遮挡住部分地图
# 收起全部缩进后查找playermode这个关键字可以让你快速理解它的结构
default playermode = 0
# (真实坐标)(X,Y)
#【角色出现在画面中的初始坐标,如替换应使用真实坐标】
default move_pos_x = 60
default move_pos_y = 60
# (虚拟坐标)(X,Y)
default move_vpos_x = 1
default move_vpos_y = 1
# (通行禁止方向)(上,下,左,右)
default move_ban_s = 0
default move_ban_x = 0
default move_ban_z = 0
default move_ban_y = 0
#判断图像的朝向
default move_set1 = 0
#判断图像是否在运动中
default move_set2 = 0
#(角色移动图像)
#【角色的图像,可自定义】
#角色静止时的图像
image move_image_x1 = "movesys/player-x2.png"
#角色运动时的图像
image move_image_x1s:
"movesys/player-x1.png"
pause 0.1
"movesys/player-x2.png"
pause 0.1
"movesys/player-x3.png"
repeat
image move_image_s1 = "movesys/player-s2.png"
image move_image_s1s:
"movesys/player-s1.png"
pause 0.1
"movesys/player-s2.png"
pause 0.1
"movesys/player-s3.png"
repeat
image move_image_y1 = "movesys/player-y2.png"
image move_image_y1s:
"movesys/player-y1.png"
pause 0.1
"movesys/player-y2.png"
pause 0.1
"movesys/player-y3.png"
repeat
image move_image_z1 = "movesys/player-z2.png"
image move_image_z1s:
"movesys/player-z1.png"
pause 0.1
"movesys/player-z2.png"
pause 0.1
"movesys/player-z3.png"
repeat
#(UI图像)
#虚拟按键
image move_ui1 = "movesys/key-fx.png"
image move_ui2 = Transform("movesys/key-fx.png",matrixcolor=BrightnessMatrix(0.2))
image move_ui3 = Transform("movesys/key-fx.png",matrixcolor=ColorizeMatrix(black_color="#a00000", white_color="#ffffff"))
image move_ui4 = "movesys/key-mode.png"
image move_ui5 = Transform("movesys/key-mode.png",matrixcolor=BrightnessMatrix(0.2))
layeredimage jsyddh:
#默认图像
if move_set1 == 0:
"move_image_y1"
#静止时图像
if move_set1 == 1 and move_set2 == 0:
"move_image_y1"
if move_set1 == 2 and move_set2 == 0:
"move_image_x1"
if move_set1 == 3 and move_set2 == 0:
"move_image_z1"
if move_set1 == 4 and move_set2 == 0:
"move_image_s1"
#运动时图像
if move_set1 == 1 and move_set2 == 1:
"move_image_y1s"
if move_set1 == 2 and move_set2 == 1:
"move_image_x1s"
if move_set1 == 3 and move_set2 == 1:
"move_image_z1s"
if move_set1 == 4 and move_set2 == 1:
"move_image_s1s"
### 动效模块 #######################################################################
#角色运动变换
#实际上是在坐标更改后,做一个”从后往前走的“假动作
transform move_set1_y:
anchor (0.5,1.0)
pos (move_pos_x-120,move_pos_y)
linear 0.5 pos (move_pos_x,move_pos_y)
transform move_set1_z:
anchor (0.5,1.0)
pos (move_pos_x+120,move_pos_y)
linear 0.5 pos (move_pos_x,move_pos_y)
transform move_set1_s:
anchor (0.5,1.0)
pos (move_pos_x,move_pos_y+120)
linear 0.5 pos (move_pos_x,move_pos_y)
transform move_set1_x:
anchor (0.5,1.0)
pos (move_pos_x,move_pos_y-120)
linear 0.5 pos (move_pos_x,move_pos_y)
#静止时的坐标
transform move_set2_p:
anchor (0.5,1.0)
pos (move_pos_x,move_pos_y)
screen move_js():
#这是一张多余的网格图,用来方便布局和让你理解这个系统
add "movesys/movetest.png"
#当判定为运动结束,显示静止的图像
if move_set2 == 0:
add "jsyddh" at move_set2_p
#否则,根据按键播放相应朝向的假动作
else:
if move_set1 == 1:
add "jsyddh" at move_set1_y
if move_set1 == 2:
add "jsyddh" at move_set1_x
if move_set1 == 3:
add "jsyddh" at move_set1_z
if move_set1 == 4:
add "jsyddh" at move_set1_s
#并在动画结束后进入对坐标进行事件判定的label
timer 0.5 action SetVariable("move_set2",0),Call("move_pd")
use move_key
screen move_key():
frame:
background None
anchor (0.5,0.5)
if playermode == 0:
pos(0.61,1.29)
if playermode == 1:
pos(1.38,1.29)
#切换左右手模式的按钮
imagebutton:
idle "move_ui4" at tybh_fxy
hover "move_ui5"
focus_mask True
if playermode == 0:
action SetVariable("playermode",1)
if playermode == 1:
action SetVariable("playermode",0)
keysym "K_q"
if move_ban_y == 0:#当角色的通行性未被禁止时,启用按键
imagebutton:
idle "move_ui1" at tybh_fxy
hover "move_ui2"
focus_mask True
if move_set2 == 1:#当角色正在播放假动作时,禁用按键,避免动画出现“断触闪现” 和 真坐标在假动作未播放完毕时持续增长
action NullAction()
elif renpy.variant("mobile"):#当设备是移动端时,按键为接触响应
hovered SetVariable("move_pos_x",move_pos_x+120),SetVariable("move_set1",1),SetVariable("move_set2",1)
action NullAction()
else:#当设备是电脑端时,按键为点击响应
action SetVariable("move_pos_x",move_pos_x+120),SetVariable("move_set1",1),SetVariable("move_set2",1)
keysym "any_K_d"#当设备是电脑端时,绑定键盘qwasd
else:
imagebutton:
idle "move_ui3" at tybh_fxy
if move_ban_x == 0:
imagebutton:
idle "move_ui1" at tybh_fxx
hover "move_ui2"
focus_mask True
if move_set2 == 1:
action NullAction()
elif renpy.variant("mobile"):
hovered SetVariable("move_pos_y",move_pos_y+120),SetVariable("move_set1",2),SetVariable("move_set2",1)
action NullAction()
else:
action SetVariable("move_pos_y",move_pos_y+120),SetVariable("move_set1",2),SetVariable("move_set2",1)
keysym "any_K_s"
else:
imagebutton:
idle "move_ui3" at tybh_fxx
if move_ban_z == 0:
imagebutton:
idle "move_ui1" at tybh_fxz
hover "move_ui2"
focus_mask True
if move_set2 == 1:
action NullAction()
elif renpy.variant("mobile"):
hovered SetVariable("move_pos_x",move_pos_x-120),SetVariable("move_set1",3),SetVariable("move_set2",1)
action NullAction()
else:
action SetVariable("move_pos_x",move_pos_x-120),SetVariable("move_set1",3),SetVariable("move_set2",1)
keysym "any_K_a"
else:
imagebutton:
idle "move_ui3" at tybh_fxz
if move_ban_s == 0:
imagebutton:
idle "move_ui1" at tybh_fxs
hover "move_ui2"
focus_mask True
if move_set2 == 1:
action NullAction()
elif renpy.variant("mobile"):
hovered SetVariable("move_pos_y",move_pos_y-120),SetVariable("move_set1",4),SetVariable("move_set2",1)
action NullAction()
else:
action SetVariable("move_pos_y",move_pos_y-120),SetVariable("move_set1",4),SetVariable("move_set2",1)
keysym "any_K_w"
else:
imagebutton:
idle "move_ui3" at tybh_fxs
### 地图模块 #######################################################################
#【此处为单幅地图的后台事件及计算,新增地图按照这个例子复制更改move_pd及move_map两个label】
#【此处用于刷新整个地图系统的数据,起中继器的作用】
label move_map:
#【此处可替换地图背景】
#由于“传送”的事件效果会使动画“断触闪现”,所以在事件判定label后新建一个中继label
scene bg
call screen move_js
jump move_map
#【此处设置地图事件】
label move_pd:
#重置通行性
$ move_ban_y = 0
$ move_ban_x = 0
$ move_ban_s = 0
$ move_ban_z = 0
#计算虚拟坐标
$ move_vpos_x = (move_pos_x+60)//120
$ move_vpos_y = (move_pos_y+60)//120
#地图边缘禁止通行,防止丢失角色画面
if move_vpos_x == 1:
$ move_ban_z = 1
if move_vpos_x == 16:
$ move_ban_y = 1
if move_vpos_y == 1:
$ move_ban_s = 1
if move_vpos_y == 9:
$ move_ban_x = 1
###此部分是为地图添加事件的例子###############################################
#(你可以通过给地图编号/变量来为每张地图设置不同的事件逻辑)
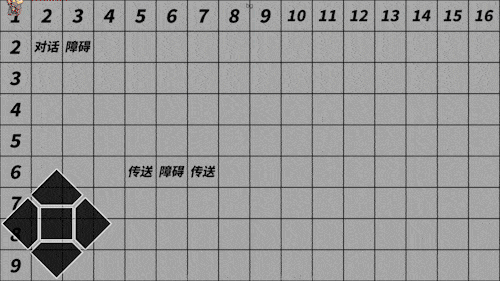
#(2,2)发生对话
if move_vpos_x == 2 and move_vpos_y == 2:
show screen move_js
"当前坐标([move_vpos_x],[move_vpos_y])"
#(3,2)禁止通行
#【此处设定地图中的障碍物,障碍物的四方对应的禁用方向键】
#【下方意为】
#【角色在虚拟坐标(2,2)时,通行禁止方向右=打开】
#【角色在虚拟坐标(4,2)时,通行禁止方向左=打开】
#【角色在虚拟坐标(3,3)时,通行禁止方向上=打开】
#【角色在虚拟坐标(3,1)时,通行禁止方向下=打开】
#(禁止通行这部分可以优化成自动计算)
if move_vpos_x == 2 and move_vpos_y == 2:
$ move_ban_y = 1
if move_vpos_x == 4 and move_vpos_y == 2:
$ move_ban_z = 1
if move_vpos_x == 3 and move_vpos_y == 3:
$ move_ban_s = 1
if move_vpos_x == 3 and move_vpos_y == 1:
$ move_ban_x = 1
#(6,6)禁止通行
if move_vpos_x == 5 and move_vpos_y == 6:
$ move_ban_y = 1
if move_vpos_x == 7 and move_vpos_y == 6:
$ move_ban_z = 1
if move_vpos_x == 6 and move_vpos_y == 7:
$ move_ban_s = 1
if move_vpos_x == 6 and move_vpos_y == 5:
$ move_ban_x = 1
#(5,6)传送至(7,6)
#【替换真实坐标表达式中的虚拟坐标即可更改】
#【由于此处例子的左侧有障碍物,于是通行禁止方向左也被打开了】
if move_vpos_x == 5 and move_vpos_y == 6:
show screen move_js
$ move_pos_x = 7*120-60#7和6是虚拟坐标
$ move_pos_y = 6*120-60
$ move_ban_z = 1
$ move_ban_y = 0
$ move_ban_s = 0
$ move_ban_x = 0
jump move_map
#(7,6)传送至(5,6)
#【传送往往是双向的,当然,你也可以建立一个单向的通道】
#【由于此处例子的右侧有障碍物,于是通行禁止方向右也被打开了】
if move_vpos_x == 7 and move_vpos_y == 6:
show screen move_js
$ move_pos_x = 5*120-60
$ move_pos_y = 6*120-60
$ move_ban_z = 0
$ move_ban_y = 1
$ move_ban_s = 0
$ move_ban_x = 0
#【你也可以在传送,或触碰障碍时进行跳转一类事件】
#【这完全取决你】
jump move_map
### 使用说明 #######################################################################
#在游戏主流程中使用jump move_map或call move_map即可调用整个地图系统

 发表于 2025-3-2 03:03:08


 提升卡
提升卡 置顶卡
置顶卡 变色卡
变色卡 千斤顶
千斤顶 发表于 2025-3-2 09:53:20
